Introduction
Many riders invest time and money into professional saddle fitting, only to lose much of that benefit in the last five minutes—while tacking up. A saddle pad that is too far forward, pulled down over the withers, folded under the panels, or sliding during the ride can quietly create pressure points and friction, even under a well-fitted saddle.
What Proper Saddle Pad Fit Really Means
Before the step-by-step, it helps to define what a properly fitted saddle pad should achieve. At a minimum, it should:
- Cover the entire weight-bearing area under the saddle panels without leaving any area unprotected
- Provide clear clearance over the withers and avoid contact with the spine
- Lie flat against the back with no wrinkles, folds, or bunching
- Remain centred and stable throughout the ride without creeping or twisting
If any of these conditions are not met, the pad is not truly “fitted,” regardless of brand, thickness, or material.
Step-by-Step: How to Fit a Saddle Pad Correctly
Step 1: Select the Right Size and Shape
Begin by confirming that the pad’s dimensions and cut match your saddle and horse. The pad should extend slightly beyond the front and back edges of the saddle panels, and enough down the sides to protect the area under the panels and girth without excessive excess flap.
For English saddles, use a dressage cut pad for a dressage saddle with long straight flaps, a close-contact or jumping cut for forward-flap jumping saddles, and an all-purpose cut only when the saddle and workload truly match that “in-between” profile.
For high-withered horses, ensure the pad has a contoured, high-wither design rather than a completely flat top line. For horses with very short backs, avoid pads that are significantly longer than the panel length, as excess pad behind the saddle can press on the loins and disturb stability.
Step 2: Place the Pad Forward, Then Slide It Back
Stand on one side of the horse and place the pad slightly forward of its final position, over the wither and shoulder area. Then slide it gently backward in the direction of the hair until it reaches the natural “seat” just behind the shoulder.
Sliding the pad back does two important things: it smooths the hair coat in the direction of growth, reducing friction risk; and it allows the pad to settle into a position that matches the shoulder and wither contours, rather than forcing it into place.
Step 3: Check Coverage and Alignment Before Adding the Saddle
With the pad in place, stand behind and slightly to one side of the horse and visually confirm that the pad covers the full weight-bearing area where the saddle panels will sit, that it is not so far forward that it interferes with shoulder movement, and that the edges of the pad will remain under the panels. If needed, you can place the saddle loosely on top to verify.
Step 4: Place the Saddle Without Dragging the Pad
Lift the saddle and gently place it slightly forward on top of the pad, then slide it back into position in the same way you did with the pad. Avoid dropping the saddle or dragging it roughly backward, as this can dislodge the pad or create wrinkles.
Once the saddle is in place, check that the pad remains centred, that it is visible evenly on both sides and at the front and rear edges, and that no part of the saddle panel is touching the horse directly. At this stage, the pad should look neat and symmetrical under the saddle from all angles.
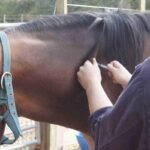
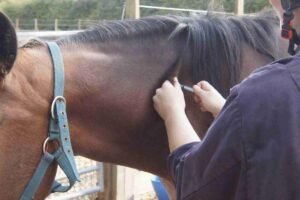
Step 5: Create Wither and Spine Clearance
Before you think about the girth, insert your fingers between the pad and the horse’s withers at the front of the saddle and lift the front of the pad up into the gullet. You are creating a small “tent” of fabric that does not rest on the withers or spine.
This is a critical step. If skipped, the pad can be pulled tight over the withers when the girth is tightened, creating pressure and friction exactly where you want clearance. For high-withered horses, this lifting action is even more important, even with a contoured pad.
Step 6: Secure Straps and Loops Without Distorting the Pad
Most English pads have front straps to attach to saddle billets or D-rings, and girth loops. Use them, but in a way that does not pull or distort the pad.
Attach the front straps so they stabilise the pad without dragging it forward or downward. Thread the girth through the girth loop so the pad stays anchored and does not slide back.
Step 7: Girth Up Gradually and Re-Check
As you attach and tighten the girth, do it in stages, alternating sides if needed. After the initial tightening, reach under the front of the saddle and lift the pad into the gullet again to ensure it has not been pulled down.
Check that there are no wrinkles or folds under the saddle area, that the pad remains centred, and that the wither and spine channel are still free of contact. Once the girth is at riding tension, visually verify from the front, side, and rear that the pad remains even and that the wither clearance is maintained.
Adapting the Fit for Different Horses and Saddles
High-Withered Horses
For horses with high or long withers, pad selection and placement are especially important. Use a pad with a high-wither cut and a generous spine rise. When positioning and lifting into the gullet, check from both sides and from the front that no fabric is resting on the top of the wither once the saddle is fully girthed.
Broad or Low-Withered Horses
On round, low-withered horses, the main challenge is often stability. Ensuring the pad is well centred, the girth loop is used correctly, and the pad is not excessively long will help prevent shifting. If slippage remains a persistent issue despite correct fit, it may indicate the need for a pad with non-slip features or a review of saddle fit.
Conclusion and Call to Action
Fitting a saddle pad correctly is a small, repeatable process with a large impact. Correct size, appropriate shape, careful placement, wither and spine clearance, and stable attachment all work together to protect your horse’s back and preserve saddle fit. When this process becomes second nature, you significantly reduce the risk of pad-related pressure, friction, or instability contributing to discomfort and performance issues.
FAQs
Do I always need to lift the saddle pad into the gullet, even with a high-wither design?
Yes. A contoured or high-wither pad helps, but it still needs to be lifted into the gullet after the saddle is placed and while girthing. This ensures the pad does not collapse down onto the withers once the girth is tight.
How can I tell if my pad is too small for my saddle?
If the saddle panels sit close to or beyond the edges of the pad when you look from the side and rear, the pad is too small. The pad should provide a visible margin of protection around the panels without being excessively long.
Is it a problem if a bit of the pad shows unevenly on one side after riding?
Slight cosmetic asymmetry can happen, but if one side consistently shows much more pad, or the pad twists noticeably, it suggests movement during the ride. That usually means the pad, saddle fit, or girthing configuration needs review.
Should I fit my pad differently for short rides versus long rides?
The fitting process itself should remain consistent. For longer rides, you may be more selective about pad materials and breathability, but the core steps—placement, centring, wither clearance, and stability—are the same whether you ride for twenty minutes or several hours.
Can a correctly fitted pad still cause issues if it is the wrong shape for my horse?
Yes. Even perfect placement cannot override a fundamental shape mismatch. For example, a flat pad on a very high-withered horse may always tend to pull onto the withers. In that case, you need both correct fitting technique and a pad shape designed for that conformation.